Curious about starting your own blog and growing your online presence? This beginner’s guide on how to start a blog with Bluehost will walk you through the essential steps you need to take to get started and help you achieve your goals.
Have you ever dreamed of starting your own blog, sharing your passions and insights with the world, or maybe just wanting to break the 9-to-5 grind?
But do you feel you are held back by a lack of experience or know-how?
I know exactly how you feel.
I, too, once doubted my ability to create a personal finance blog that would make an impact.
As someone who had a whopping ZERO experience in the online blogging world, I found (to my surprise) that by taking a leap of faith and venturing into the world of blogging, I quickly learned the skills necessary to launch and grow a successful, profitable blog.
I was SO inspired by all the fascinating stories of how bloggers were earning several thousands of dollars a month.
And to be honest, I never really had the expectation to become a blogger (I’m still not used to calling myself a blogger). But fast forward to now, I now have my own blog and regularly post content.
Better yet, my blog is primed for success. It has all the monetization methods incorporated, meaning as it grows, so too will my income!
Don’t get me wrong, I’ve had many struggles and roadblocks while building my blog. I’ve battled with some serious cases of imposter syndrome, thinking “I’m not good enough” or “I’m out of my depth”, but I never let these setbacks hold me back and quit.
Because when you break it down and realize that your blog doesn’t have to contain professionally written research papers (No one’s got time for that!), and you realize instead that your readers are here to learn more about you, your journey, and how you can help them with a particular topic, well that change in mindset can create extraordinary results.
That’s why in this post, I want to inspire and empower you to follow your own aspirations and start a blog with Bluehost, just as I did.
I’ve learned so much about the tools, resources, and strategies that can help you build a thriving online presence, and I’m passionate about sharing this knowledge with you as a fellow individual who started from nothing! No matter where you are in your journey, you too can achieve success in the world of blogging, even if you’re starting from scratch.
By the end of this guide, you’ll have a clear understanding of how to set up and launch a blog using Bluehost as your web host provider. With their user-friendly platform and exceptional customer support, you’ll find yourself quickly mastering the ins and outs of blogging. So, let’s embark on this exciting adventure together and unlock your true potential as a blogger.
Alright, are you excited?
I know I’m very excited for you and I can’t wait for you to start a blog with Bluehost!
But before we start..
I do have one thing to ask of you if you REALLY are committed to starting a blog.
And that one thing is..
To keep me updated on your progress.
I don’t want this post to be a one-sided flow of information! I want to hear from you, your progress, your journey – your successes and hardships!
I also offer my exclusive FREE 7-day email guide (YES, FREE!) to teach total beginners like you how to start your blog from scratch. I show you the EXACT steps I took to start a blog all the way from scratch, without tech or writing experience. My e-mail course has helped many others start a profitable blog and I would love to help you too. Sign up below to learn how!
This is a very long and informative post on how to start a blog with Bluehost. You don’t want to miss this valuable information, so be sure to bookmark this page or save it for later so you can refer back to it as you’re progressing through the steps!
Embarking on your blogging journey begins with understanding the key steps involved in setting up your blog with Bluehost. This guide will walk you through the process, ensuring that even if you’re new to blogging, you can successfully create your blog with confidence.
Need More Information About Bluehost?
If you're looking for more information about the Bluehost web hosting platform, I have written a detailed review that uncovers all the features, benefits and cons.
Unlock Your Blog's Potential: How to Select the Perfect Niche for Your Online Success
Embarking on your blogging journey begins with a crucial decision: selecting the perfect niche for your blog. This first step will set the foundation for your online success, as it determines the topics you’ll write about, the audience you’ll target, and the monetization opportunities you’ll explore. We’ll dive into the essential considerations and tips to help you pick the right niche that aligns with your passion, expertise, and goals.
If you want to start a blog and make money with it, the first thing you’ll want to do is determine a blog niche that is profitable, or at least has monetization potential.
A niche is a specific area of focus or a particular subject matter that your blog will concentrate on.
In other words, what will your blog be about?
By choosing a niche, you’re able to target a well-defined audience with content tailored to their interests, making your blog more relevant and engaging to that specific group.
Picking a niche is vital to blogging success for several reasons:
- It helps you establish your blog’s identity, making it stand out among the countless blogs online.
- It enables you to build authority and expertise within a specific subject matter.
It makes it easier for you to target a loyal and dedicated audience who will be interested in your content.
When choosing a blog niche, remember that readers visit your page because they want information from you. Information to help them solve their problem, or information that motivates them. This is the first thing you must consider and it’s what separates a blog that makes money from one that doesn’t.
So, before you choose your blog niche, I highly recommend choosing 1) a topic you enjoy talking about and 2) being able to help or serve your readers.
Most important is that you choose a niche that you are passionate about. At the end of the day, you don’t want your blog to feel like a chore or another 9-5 job that is there purely to make you money. If you do, it’s a recipe for disaster since it will be a LOT easier to give up and quit if you don’t see growth in the early phases of your blog. And trust me, this is not uncommon. It typically takes more than 6-months for your blog to start seeing results, so you need perseverance. And how you achieve that is by writing about content that you enjoy.
Essential Steps to Picking a Profitable and Successful Niche for Your Blog

To pick a niche for your blog, follow these steps:
- Identify your interests and passions: Consider what topics you’re knowledgeable about and enjoy discussing. Your passion for the subject matter will help keep you motivated and engaged with your blog. An important thing to note here is that even if you aren’t an expert in the topic, your passion for learning the particular topic will triumph the lack of knowedge you have about the topic. Readers enjoy the journey just as much as the content. So if you’re providing insightful content about a topic you are learning about, it will be much more relatable.
- Research the competition: Analyze other blogs in your chosen niche to identify gaps in content, unique perspectives, or new approaches that you can bring to the table. Think to yourself, “what would I Google?” if I were looking for information related to the blog niche, and see if you could produce content similar to, or improve upon the posts that come up from your Google search.
- Assess the market demand: Ensure that there is a sizable audience interested in your chosen niche. Conduct keyword research and analyze search trends to gauge the level of interest in your topic. This will help you determine if your niche has the potential to attract readers and generate traffic.
There are countless profitable niches for you to choose from, but to get you started, have a look at some below. I’m sure at least ONE of these interests you! Remember, as a blogger, you don’t have to be an expert in the niche. You can blog from the angle as either an expert or a beginner who is just learning about the topic.
- Personal finance: Topics like budgeting, saving, investing, debt management, a personal finance journey, and retirement planning are always in high demand. You can share tips, strategies, and personal experiences to help readers improve their financial situation.
- Health and wellness: This niche covers a wide range of topics such as nutrition, exercise, mental health, stress management, and self-care. You can create content that helps readers improve their overall well-being.
- Travel: Share travel tips, destination guides, budget travel hacks, and personal travel stories. As a travel blogger, you can collaborate with travel agencies, hotels, and tour companies for sponsored content or affiliate marketing opportunities.
- Food and cooking: Share recipes, cooking tips, meal planning ideas, and reviews of kitchen gadgets or appliances. You can also focus on specific diets like vegan, gluten-free, or paleo to cater to a niche audience.
- Parenting: Offer advice, tips, and personal stories on various aspects of parenting, including child development, education, discipline, and family activities. You can also review parenting products and collaborate with relevant brands.
- Technology: Write about the latest gadgets, software, apps, or industry trends. You can provide reviews, tutorials, and comparisons of various tech products and services.
- Personal development: Cover topics such as productivity, time management, goal setting, and personal growth. Share your insights, tips, and experiences to help readers improve their lives and achieve their goals.
- Home and DIY: Offer advice on home improvement, organization, interior design, and DIY projects. Share tutorials, before-and-after transformations, and product recommendations to help readers create their dream homes.
- Online marketing and entrepreneurship: Share strategies, tools, and tips on topics like SEO, social media marketing, email marketing, and online business development. Help aspiring entrepreneurs and business owners grow their online presence and achieve success.
- Education and career: Provide guidance on college selection, test preparation, career planning, and professional development. Offer tips and resources for students and professionals looking to advance their education or career.
- Fashion and beauty: Share fashion tips, outfit ideas, makeup tutorials, and product reviews. You can collaborate with fashion and beauty brands for sponsored content or affiliate marketing opportunities.
- Sustainable living and eco-friendly practices: Share tips and advice on living a more sustainable lifestyle, including topics like zero-waste living, renewable energy, and eco-friendly products.
When choosing a niche, consider your interests, expertise, and target audience. It’s important to pick a niche you’re passionate about, as it will make it easier for you to create engaging content and build a loyal following.
You Don't Need To Be An Expert In Your Chosen Niche
I’ll be honest with you, when I first embarked on my blogging journey in the realm of personal finance, I wasn’t an expert by any means (and I’m still not). In fact, I was just as bewildered as you might be right now, unsure of where to start or what steps to take.
My blog began as a spontaneous leap of faith, and over time, I learned and grew through hands-on experience. Bit by bit, I accumulated knowledge and insights that transformed into a valuable treasure trove of information. It’s this very wisdom that has enabled me to take my blog from obscurity to a platform that reaches an ever-growing audience.
So, what’s the key takeaway here? You don’t need to be a seasoned expert in your chosen niche to create compelling and informative content. By simply documenting your learning journey, sharing your triumphs and setbacks, and teaching others the lessons you’ve picked up along the way, you’ll set the stage for a thriving and successful blog.
Crafting the Perfect Blog Name: Tips for a Memorable and SEO-friendly Title
After identifying your ideal niche, the next step in creating your online presence is choosing the right name for your blog. The name of your blog is directly tied to your domain name. This is what your aduience will type into Google.
Choosing the right name for your blog is an essential step in creating your online presence, and it can often be a roadblock for many aspiring bloggers. Don’t let indecision hold you back from starting your blogging journey. Instead, use the following tips to brainstorm ideas and pick the perfect blog name.
One important thing to remember is that if you have a domain name in mind and it’s available, it’s best to act quickly and secure it. Domain names can be taken at any moment, and you don’t want to miss out on your ideal name. Many bloggers, including myself and friends, have experienced the regret of waiting too long and losing the perfect domain name to someone else.
With that in mind, here are some tips to help you come up with a memorable and SEO-friendly blog name:
- Reflect your niche and content: Your blog name should give readers a clear idea of what your content is about. Make sure it aligns with your chosen niche, as this will help you connect with your target audience and create a sense of consistency throughout your blog.
- Keep it short and memorable: Aim for a blog name that is concise, easy to remember, and simple to spell. A shorter name is typically easier for people to recall and share with others, which can boost your blog’s visibility.
- Be original and unique: Choose a blog name that stands out and avoids confusion with existing blogs or brands. Doing a quick search for similar names can help you ensure that your chosen name is unique and doesn’t infringe on any trademarks.
- Consider SEO: Incorporating relevant keywords in your blog name can help with search engine optimization (SEO). However, don’t sacrifice creativity for the sake of SEO. Strive for a balance between a catchy, unique name and one that includes relevant keywords.
- Check domain name availability: Once you have a few blog name ideas, make sure the corresponding domain names are available. You can use a domain registrar like Namecheap to check the availability and register your preferred domain name. Just type in the domain name you want and hit ‘search’ to check if it’s available. Make sure you include the .com extension (or whatever extension you are after, .com.au, .uk, .net etc) on the end of the domain name you enter.
As an example, let’s take a look at my own blog name, TrajectoryToWealth.com. This personal finance blog name reflects the niche and content by conveying the idea of financial growth and progress. It’s short and memorable, making it easy for readers to recall and share. The name is also original and unique, setting it apart from other personal finance blogs. While it doesn’t directly incorporate SEO keywords, it does convey a sense of financial success, which is relevant to the target audience. Lastly, I made sure the domain name was available before committing to it.
Remember, choosing the perfect blog name is an essential step in building your online presence, so take your time and follow these tips to create a name that resonates with your audience and sets you up for success.
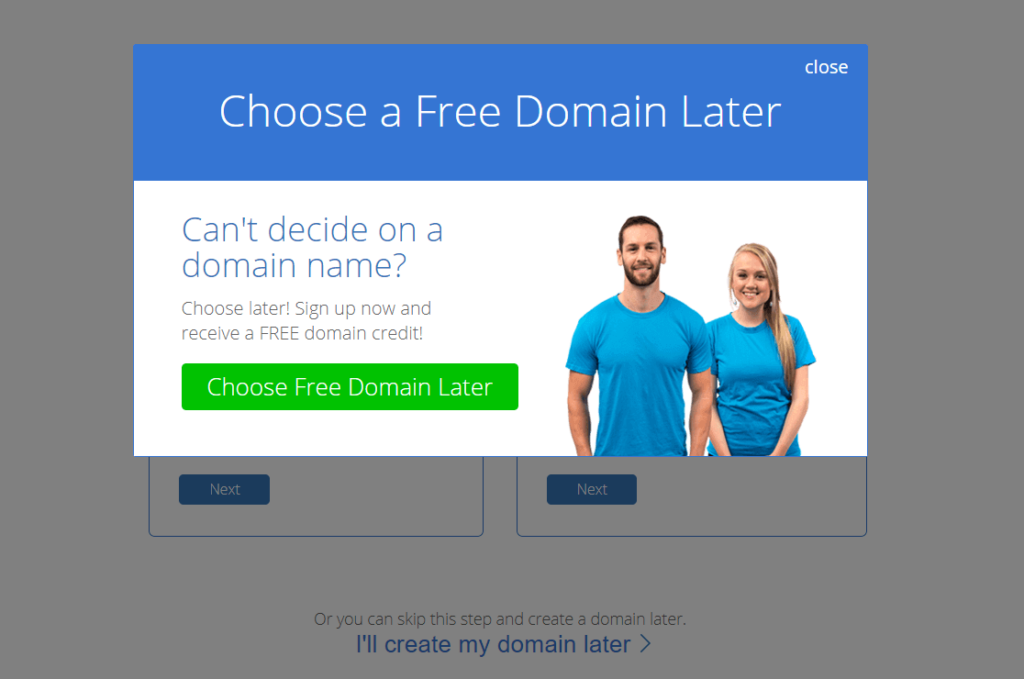
Start A Blog With Bluehost: Choosing Your Domain Name Later
If you’re finding it difficult to decide on your blog name (domain name), don’t let that stop you from getting started with your blog. Bluehost offers a solution that allows you to choose your name later. This way, you can begin building your blog, creating content, and refining your ideas without being held back by the domain name decision.
With this option, you can focus on what matters most at the beginning of your blogging journey: producing quality content, connecting with your audience, and developing your brand. Once you’ve gained more clarity and confidence in your niche, you can then choose the perfect domain name that accurately represents your blog’s identity and purpose.
Commonly Asked Questions About Domain Names
Where Can I Register My Domain Name
I personally purchase all my domain names from the company Namecheap. They offer low-cost domain registration and come with free privacy protection, which I would always recommend having!
Although Bluehost (as you will find out in a later section) offers free domain name registration for the first 12 months, they don’t offer free privacy protection for your domain name. Adding that feature actually costs more than the total cost of registering a domain on Namecheap for 12-months. So considering domain privacy protection comes free with Namecheap, you can’t go wrong! I’ve also discussed in a lot more detail in a previous post of mine why I always use a separate domain registrar (the company that manages your domain) from my web host (the company that manages your website data).
Can I Change My Domain Name After I Have Created My Blog
Yes, you can change your domain name after you have started your blog, but it’s not without its challenges. Let me share my personal experience with you to illustrate the complications that can arise.
A few months after I started blogging, I decided to change my domain name. Although it was possible, I had to go through several steps, including registering a new domain, setting up redirects, and updating my branding. Redirects ensure that visitors who use your old domain name are automatically directed to your new domain, preventing any loss of traffic. While I don’t want to delve into thetechnical details of setting up redirects, it’s important to understand that it requires extra work and can be time-consuming.
Changing your domain name can also impact your SEO rankings, as search engines may take some time to re-index your new domain and update their records. This can temporarily affect your blog’s visibility and organic traffic.
Not to mention it costs more! You can’t simply ‘edit’ your domain name once you’ve registered it. Instead, to change your domain name you have to register a new domain name entirely, which you then link or ‘point’ to your web host so you can access your blogs data that is linked that domain name.
All things considered, while it is possible to change your domain name after starting your blog, it’s better to put in the effort upfront to choose the right domain name from the beginning. This will save you time, money and potential complications down the road, allowing you to focus on creating content and growing your blog instead of dealing with the challenges associated with changing your domain name.
Choosing the Best Web Hosting for Your Blog: Optimize Your Site with Bluehost
You’ve made great progress on your blogging journey by selecting a niche and choosing your domain name.
But now it’s time to take the next crucial step: selecting a reliable web hosting provider.
A web host can make all the difference in your blog’s performance, security, and success. That’s why I recommend Bluehost as your go-to choice for web hosting. In this section, we’ll explore why starting a blog with Bluehost is the ideal option and discuss the benefits it offers to bloggers like you.
Why Choose To Start A Blog With Bluehost
Selecting the right web hosting provider is essential for your blog’s success. While there are many hosting options available, Bluehost stands out as the ideal choice, especially for beginners.
Your web hosting provider is essentially the platform that enables your blog to exist – it hosts all your blog’s data. So it’s important to be aware of what provider is best suited for you.
While there are numerous free blogging platforms available, they come with several drawbacks that make them less than ideal for serious bloggers. One significant concern is the ownership of your content. When you use a free platform, your blog’s content is often owned by the platform itself rather than you. This means that they have the power to take down your blog or restrict its access without notice, potentially resulting in the loss of your hard work and the audience you’ve built.
Given these concerns, it’s clear that opting for a reputable paid web hosting provider like Bluehost is a much better choice for those who are serious about blogging.
Starting a blog with Bluehost powered by WordPress here makes it easy for you to set up your blog without any technical or coding skills required.
The Benefits of Bluehost for Blogging
Let’s explore the various advantages of why you should start a blog with Bluehost and discuss why it’s a great option for those just starting their blogging journey.
WordPress Compatibility: Bluehost is officially recommended by WordPress.org, which means it is optimized for the platform and provides seamless integration. This compatibility allows you to take full advantage of WordPress features and plugins, ensuring that your blog runs smoothly and efficiently. WordPress is the best option for beginners, as it offers a user-friendly interface, extensive customization options, and a vast community of users and developers to support you on your journey.
Reliability and Performance: Unlike free web hosting providers, Bluehost offers reliable and stable hosting services, ensuring that your blog is up and running 24/7. Their uptime guarantee gives you peace of mind, knowing your blog will be accessible to your audience without interruptions. Additionally, Bluehost’s performance is top-notch, providing fast loading times and excellent site performance, which are crucial factors for both user experience and SEO.
Customer Support: Bluehost provides excellent customer support, with a team of experts available 24/7 to assist you with any questions or issues you may encounter. Their knowledgeable and friendly staff can help you with everything from setting up your blog to troubleshooting technical issues. In contrast, free web hosting providers often offer limited or no customer support, leaving you to fend for yourself when problems arise.
Room for Growth: As your blog grows, Bluehost offers plans that can grow with you. You can easily upgrade your hosting plan to accommodate increased traffic and resource demands without any hassle. Free web hosting providers typically impose strict limitations on storage, bandwidth, and resources, which can hinder your blog’s growth and expansion.
Enhanced Security: Bluehost takes security seriously, offering features such as SSL certificates, daily backups, and malware scanning to protect your blog and its data. Free web hosting providers often lack these essential security measures, putting your blog and its visitors at risk.
Greater Control and Customization: Bluehost allows you to have complete control over your blog, enabling you to customize its appearance, functionality, and settings to match your vision. Free web hosting providers often impose restrictions on customization, and some even display unwanted ads on your blog, negatively impacting the user experience.
Professionalism and Credibility: By investing in a paid web hosting provider like Bluehost, you’re demonstrating to your audience that you’re serious about your blog and its content. A custom domain name and a reliable hosting service lend credibility and professionalism to your blog, which can help attract and retain readers.
In summary, choosing Bluehost as your web hosting provider offers numerous benefits over free web hosting options. Bluehost’s compatibility with WordPress, excellent performance, outstanding customer support, and robust security features make it the perfect choice for bloggers, especially those just starting their journey.
Exclusive Discounts For Trajectory To Wealth Readers
I’m thrilled to share with you that TrajectoryToWealth readers are eligible for discounted Bluehost plans that can kickstart your blogging journey. When you start blog with Bluehost with this exclusive page here, you’ll be eligible for a special discounted price on Bluehost hosting plans, making it even more affordable to select the best plan for your needs.
You’ll save big and get up to 70% off web hosting, paying as low as $2.95 USD a month for 12 months (that’s an upfront payment of less than $36 for the full year). Plus, you’ll get a FREE domain name ($15 value) when you use this page to start your blog and go for at least a 12-month plan.
This exclusive Bluehost offer, made possible through our association with Bluehost, is seriously one of the most affordable ways to start a blog. It allows you to invest in your blog’s growth without stretching your budget.
You’ll be able to concentrate on crafting engaging content and cultivating a robust online presence.
Remember, I personally recommend the Choice Plus plan for its additional features and benefits that will support your blog as it flourishes.
Don’t miss this limited-time opportunity and join the growing community of successful bloggers who have chosen Bluehost to launch their online journey.
Sign Up for a Bluehost Hosting Plan
Get Started With Bluehost Today
EXCLUSIVE DISCOUNT for Trajectory To Wealth readers - Get 70% Off Your Web Hosting Plan.
Access Bluehost’s website: Utilize my referral link to benefit from exclusive discounts for Trajectory To Wealth readers and navigate to Bluehost’s hosting plan page.
Pick a hosting plan: Opt for a plan that aligns with your needs and budget. I recommend the Basic plan for beginners just starting out, otherwise the Choice Plus plan for its added features and advantages (so you will never have to upgrade as your blog starts to grow). You do also have the option to register your domain name for free for the first 12 months when you sign up to a Bluehost web hosting plan. This is a great option if you didn’t purchase it through Namecheap (just remember you may have to pay extra for domain privacy protection with Bluehost).
Input your domain name: During the sign-up process, enter the domain name you’ve chosen and registered (where you purchased it doesn’t matter). This will connect your domain with your Bluehost hosting account. Otherwise, if you haven’t decided on your domain name but want to get started creating your blog, you can opt to enter your domain name later (don’t worry, I cover this in a lot more detail in the next section).
By following these steps and considering the importance of choosing the right niche, you’ll be well-prepared to start a blog with Bluehost, even if you have zero experience.
Step-by-Step Guide to Start A Blog with Bluehost
We’ve finally reached the exciting part of this post – where you get to actually start a blog with Bluehost!
It’s now time to sign up with Bluehost and set up your blog. I’m going to walk you through the step-by-step process of creating your Bluehost account, connecting your domain name, and installing WordPress.
Let’s dive in and get your blog up and running in no time!
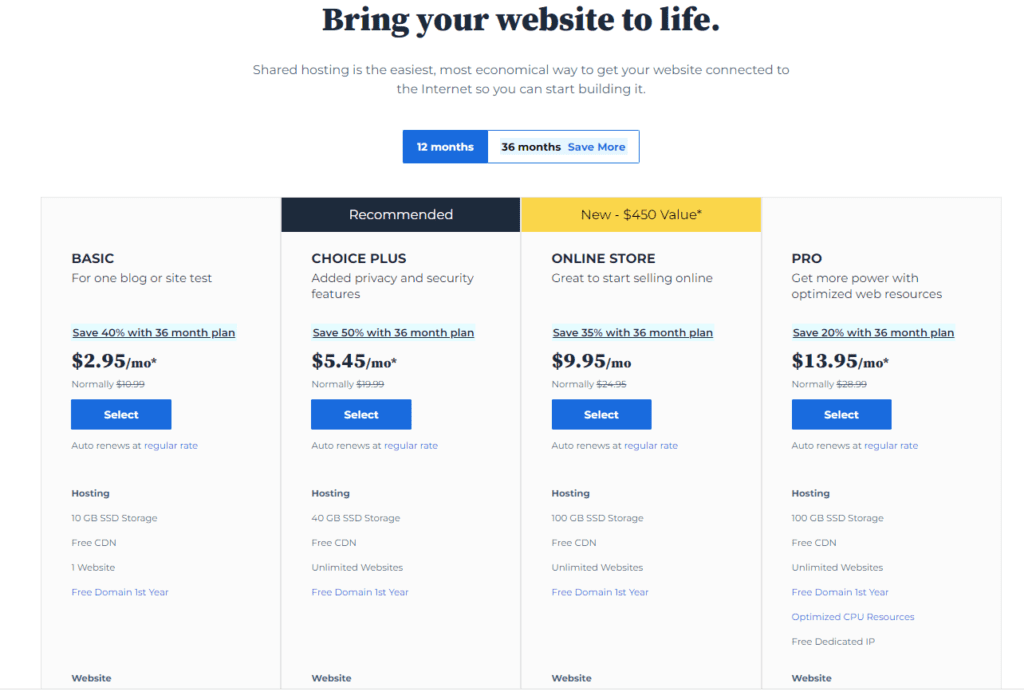
Selecting Your Bluehost Plan
Click on the blue button, “Get Started” when you enter this Bluehost discount page right here.
Choose Your Bluehost Web Hosting Plan
Next you select which web hosting plan you want.
There’s two options that I would recommend choosing:
- The “Basic” 12-month plan: This is the cheapest price to start your blog.
- The “Choice Plus” 12-month plan: Although it costs more than the basic plan, this plan comes with much more features and data usage limits, so you won’t need to upgrade in the future as your blog starts to expand.
The Basic plan is definitely more affordable since it only costs $2.95 USD per month using the special discount link above (one single upfront payment for the full 12 months)
This plan is a great choice if you want to try out blogging without spending a lot of money upfront. Remember, you do have the option to register a FREE domain name when you sign up for any of the Bluehost plans.
The ‘Choice Plus’ plan is a great pick if you are serious about growing your blog quickly. It will eliminate you from running into issues such as overusing the resource limits allocated in the Basic plan. As blogs grow, they start to use more resources, which is why you may need to upgrade in the future if you go with the basic plan. This Choice Plus plan puts you ahead of the curve, as well as providing additional optimized features for your blog.
At the end of the day, it comes down to your preference. If you’re just experimenting and want to minimize your budget, then the Basic plan should be more than sufficient.
I personally started off on the Basic plan, but have since upgraded to a higher-tiered plan for the increased resources and optimized site features!
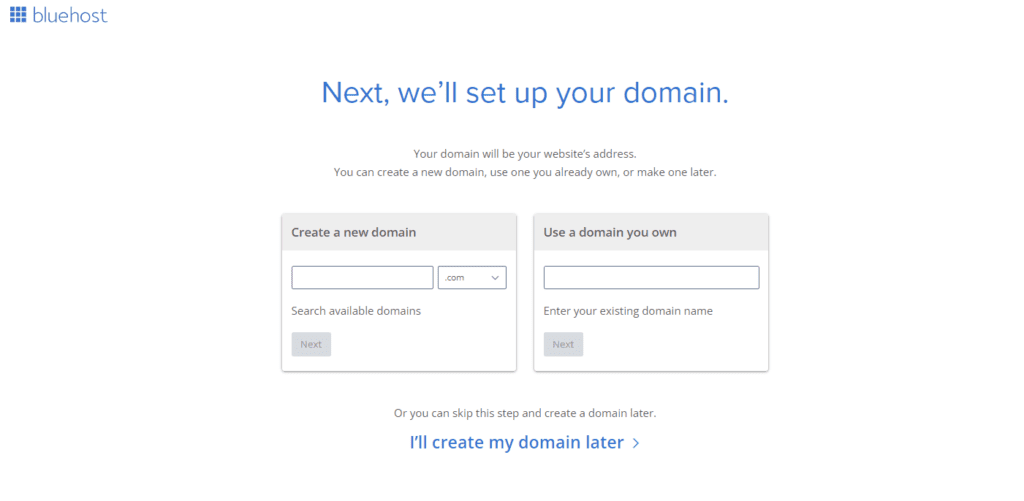
Set Up Your Domain Name With Bluehost
Next, it’s time to register your domain name. I mentioned earlier that you can either register a new domain with Bluehost, or an already existing domain name if you purchased it from Namecheap.
You can also skip this step and enter your domain name at a later time as we discussed in an earlier section!
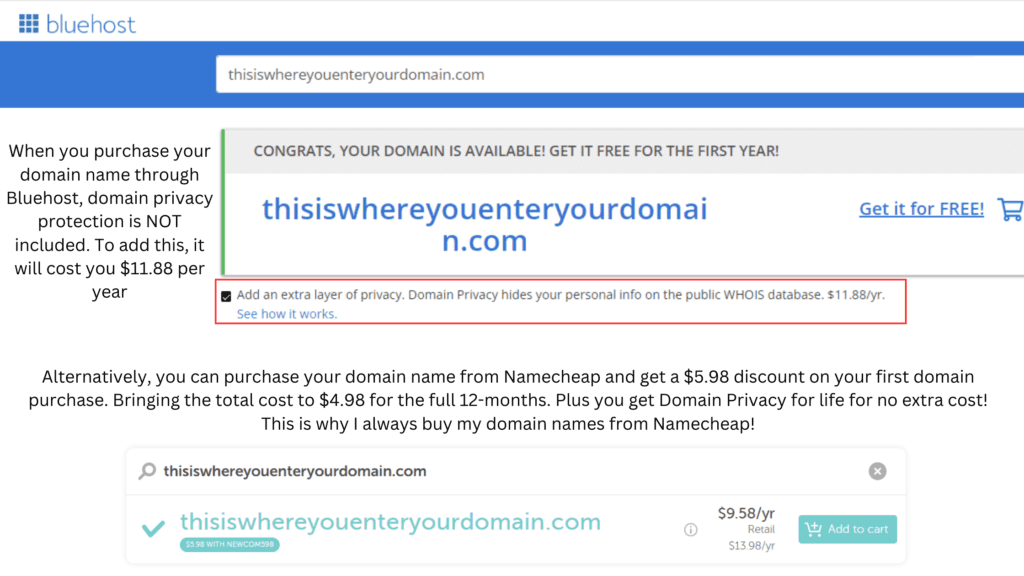
Save Money With Namecheap And Protect Your Privacy
I did the research and this little hack will save you money in the long-run whilst maximising your privacy. I’m excited to share this little money hack with you (consider it my gift to you for sticking with me for this entire post!).
So here it is – my money savings hack!
While you can purchase your domain from Bluehost during the signup process, an alternative option is to buy your domain from Namecheap and connect it to your Bluehost hosting instead.
Namecheap is a well-established and trustworthy company that offers affordable domain registrations, particularly for first-time buyers. But what truly sets Namecheap apart is their lifetime free WHOIS domain protection included with all domain registrations.
WHOIS protection is essential for new bloggers as it helps maintain your privacy by masking your personal information (such as your name, address, and contact details) from public view in the domain registration database. This prevents spam and potential security threats to your personal information.
Although Bluehost provides a free domain for the first 12 months, it does not include WHOIS privacy protection. Adding this service to your Bluehost domain costs $11.88 per year. Additionally, when you renew your domain with Bluehost, you’ll be paying a higher renewal fee plus the cost of the WHOIS protection.
On the other hand, with Namecheap, you can purchase your first domain for just $4.98, and it comes with lifetime WHOIS privacy protection. This means you’ll never have to pay for WHOIS protection again, only the domain renewal fees. By choosing Namecheap, you can save money while ensuring your privacy remains protected.
Create Your Account With Bluehost
Setting up your account with Bluehost is a straightforward process. Just follow these steps, and you’ll be well on your way to launching your blog.
Start by entering your personal details, including your first name, last name, country, and other essential information, as shown in the screenshot below.

Next, select the account plan that suits your needs. You can choose between the 12-month and 36-month plans. While the 12-month plan offers more flexibility, the 36-month plan usually provides better value in the long run. All plans come with a free Let’s Encrypt SSL, which secures your site by encrypting data exchanged between your visitors and your website.
Keep in mind that the pricing will be automatically converted to your local currency, depending on your location. Residents of countries like Canada, the U.K., Australia, and Europe will see their respective currencies, while others will see prices in US Dollars.
Bluehost offers various package extras, such as:
Single Domain SSL: A Secure Socket Layer (SSL) certificate for a single domain, providing encryption and security for data transmitted between your website and its visitors. Essential for e-commerce and handling sensitive information.
SiteLock Security – Essential: A website security service offering daily scans, malware removal, and protection against potential threats to your site. Ideal for keeping your blog safe from cyberattacks.
Yoast SEO Premium: A premium version of the popular Yoast SEO plugin for WordPress, offering advanced features and tools to optimize your blog’s search engine visibility, including keyword optimization, content analysis, and internal linking suggestions.
Site Backup: A service that automatically backs up your website data, including files and databases, to protect against data loss from technical issues, hacking, or human error. Essential for safeguarding your blog’s content and ensuring a quick recovery in case of any issues.
Each of these add-ons provides additional features or security for your blog. However, as a beginner, you might not need all of these extras. While they can enhance your site’s performance and protection, they aren’t essential for getting started. You can always add them later if you decide you need extra features.
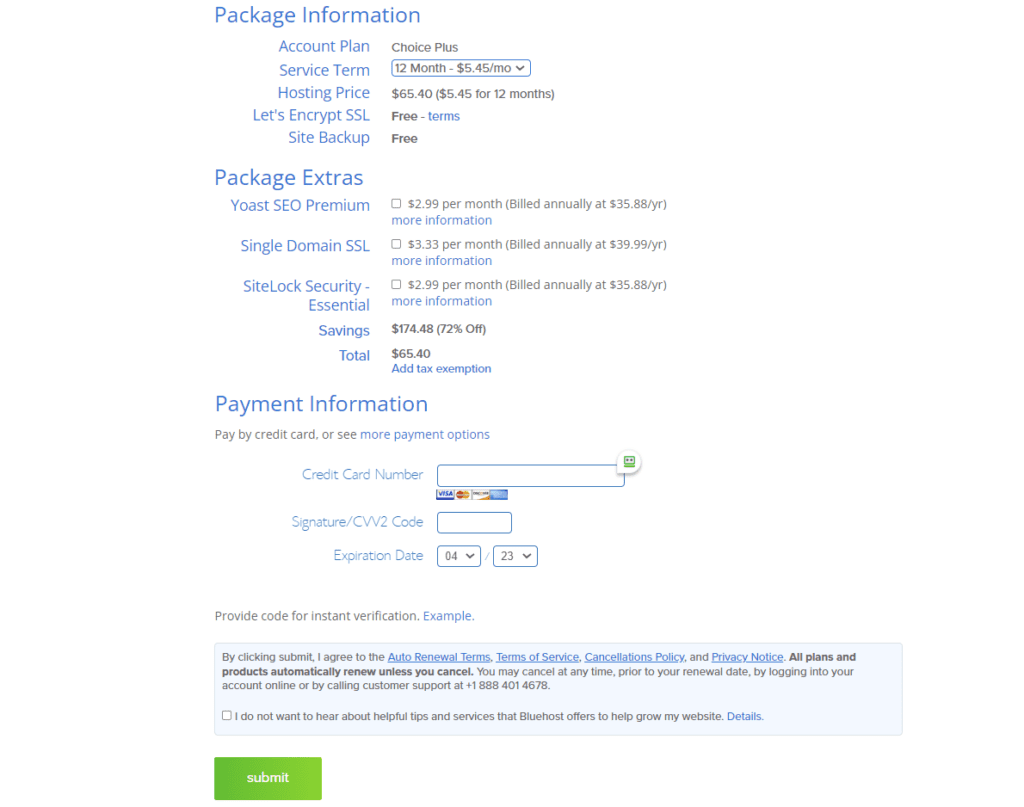
Finally, proceed to the next step to enter your payment details.
If you don’t have a credit card or prefer not to use one, you can choose to pay with PayPal by selecting “more payment options” shown in the image above. Signing up for a PayPal account is free and easy.
Once your payment details are entered, read through and accept Bluehost’s privacy terms & conditions and click the “Submit” button.
You will then be prompted to a create a password for your account before clicking the “Create Account” button.
And just like that, you now have your very own Bluehost account – and you’re now ready to install WordPress!
Install WordPress with Ease: Start A Blog With Bluehost on a User-Friendly Platform
No need to fret, you’re nearly there! This is where the excitement begins!
After purchasing your hosting plan and securing your free domain name, it’s time to move on to the last step – installing WordPress!
Thankfully, Bluehost makes this process a breeze with their convenient 1-click WordPress Installation feature.
Simply click the button, and let the magic happen as WordPress gets installed seamlessly.

Once installation is complete, Bluehost will ask you: “What kind of site can we help you set up?”
There are two options: “Business” or “Personal.”
It doesn’t really matter which option. This is just a way for Bluehost to understand your preferences and potentially offer you relevant suggestions or tools to help you build your site. You can choose the option that best describes your site, but ultimately, you’ll still have full control over your site’s design, features, and content, regardless of the option you select.
You are now the proud owner of your very own website!
A handy tip – save this link as a bookmark to conveniently access your dashboard whenever you need to:
Your WordPress dashboard link: https://yourdomainname.com/wp-admin/
Customize and Design Your Blog with WordPress
Once you’ve installed WordPress, it’s time to create an appealing and functional design for your blog using WordPress.
As the most popular content management system, WordPress offers a user-friendly interface, countless themes, and an extensive library of plugins to help you tailor your blog to your needs and preferences.
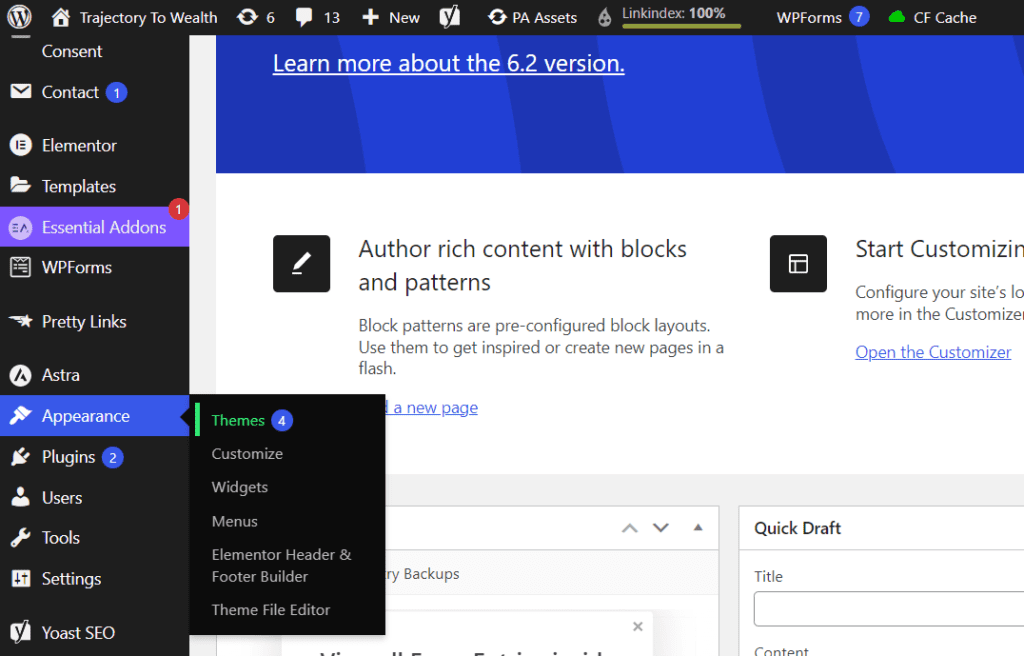
In your WordPress dashboard, navigate to “Appearance” => “Themes” to explore a variety of free and paid themes you can choose from. WordPress makes it effortless for you to add and customize the theme you desire for your blog.
- Install and activate the theme: Once you’ve chosen a theme, click “Install” and then “Activate” to apply it to your blog.
I highly recommend a simple, user-friendly theme like Astra, which is perfect for beginners. Astra is a lightweight, fast-loading theme with a clean design and customizable layout options. It’s an excellent choice for any blogger looking to create a professional-looking site with ease. In fact, I still use Astra for my own blog, trajectorytowealth.com.
As a beginner, starting with a free theme won’t hinder your ability to make money with your blog. Just ensure it looks modern, clean, and visually appealing.
Remember, you can always change your theme later on, as there is a vast selection of free and paid themes available. Once you’ve become more familiar with WordPress and blogging, you can consider upgrading to a specific theme that aligns with your preferences and style.
P.S. Don’t worry about the extra options and plugins you may see in the below image. This is actually a screenshot of my own WordPress panel, so you will notice I have some additional plugins and options to select from which doesn’t come installed on a freash WordPress site like yours. But don’t worry, as you grow and start working on your blog, you will add additional plugins like I have.
To summarize how to customize your theme and your website after it is installed, follow these steps:
- Access the Customizer: In your WordPress dashboard, navigate to “Appearance” and then “Customize.” This will open the WordPress Customizer, where you can make adjustments to your blog’s design and layout.
- Adjust theme settings: Each theme comes with its own unique set of options and settings. Familiarize yourself with these and make any necessary changes to match your blog’s brand and style.
- Edit your blog’s header and footer: Customize your blog’s header and footer by adding your logo, updating the menu items, and including any relevant widgets or social media links.
- Customize your blog’s typography and colors: Choose fonts and colors that align with your brand and improve the overall readability of your content.
Install Essential WordPress Plugins
As I briefly mentioned before, you can add functionality to your blog by activating plugins.
Plugins are essential tools that add new features and extend the functionality of your WordPress blog. They can help you customize your site, optimize it for search engines, improve user experience, and much more. In this section, we’ll discuss what a plugin is and how you can activate it to enhance your blog.
A WordPress plugin is a piece of software that can be installed and activated on your blog to provide additional features or functions. They are designed to integrate seamlessly with your blog’s core system, making it easy for you to add specific features without needing to code them yourself. Whether you need to improve your blog’s SEO, add a contact form, or create an online store, there’s likely a plugin available to help.
To activate a plugin, follow these simple steps:
- Log in to your WordPress dashboard.
- Navigate to the “Plugins” tab on the left-hand side menu.
- Click “Add New” at the top of the page.
- Use the search bar to find the plugin you’d like to install. You can search by the plugin’s name or by the functionality you’re looking for.
- Once you find the plugin, click “Install Now” to begin the installation process.
- After the plugin is installed, click “Activate” to enable its features on your blog.
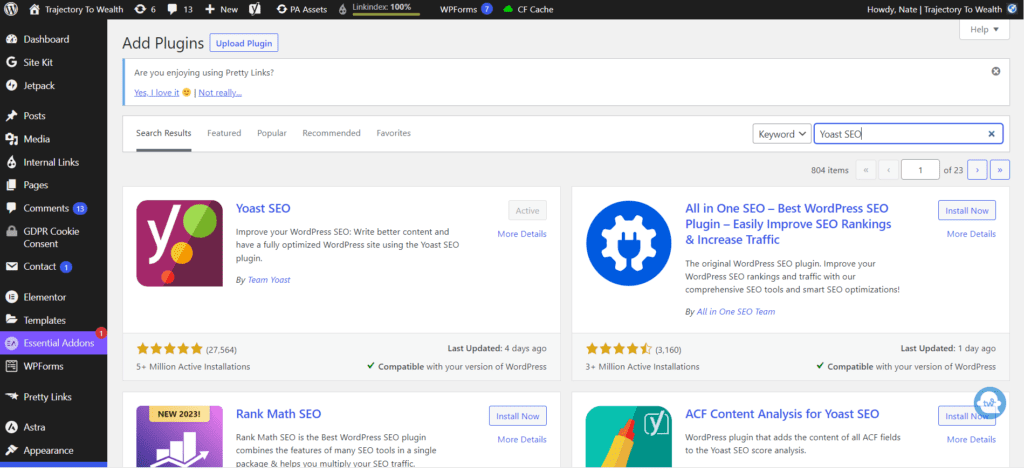
Remember to keep your plugins updated and only install plugins from reputable sources to ensure the security and performance of your blog. Additionally, it’s a good idea to only activate the plugins you need to avoid overloading your blog with unnecessary features.
Some plugins I recommend for new bloggers include Yoast SEO (for optimizing your content for search engines) and Akismet (for spam protection)
Configure plugin settings: After installing a plugin, be sure to configure its settings to ensure optimal functionality.
Start A Blog With Bluehost Summarized
Congratulations! You have completed all the necessary steps to start your own blog with Bluehost. Let’s recap what we’ve covered in this guide:
- Choose a niche: Find a topic you are passionate about and knowledgeable in.
- Pick a domain name: Register a unique and catchy name for your blog.
- Sign up with Bluehost: Choose a plan that suits your needs and provides reliable web hosting.
- Install WordPress: Use the 1-click installation process to set up your blog.
- Select a theme: Choose a free or paid WordPress theme that is user-friendly and visually appealing.
- Install plugins: Add plugins to improve the functionality of your blog.
Remember, starting a blog is a journey and there will be many opportunities to learn and grow along the way. But with the help of Bluehost and the guidance provided in this guide, you are well on your way to building a successful blog.
But that’s not all this guide is going to cover.
Now that you have a blog, we have to focus on the most important part:
- Start creating content: Begin writing blog posts that engage your audience and provide value.
Create and Publish Engaging Content
With your blog set up and designed, it’s time to focus on creating high-quality, engaging content that will captivate your audience and keep them coming back for more.
One of the most important aspects of running a successful blog is creating engaging content that resonates with your audience. By providing valuable and informative content, you can establish yourself as an authority in your niche and build a loyal following. Let’s discuss how to plan and write engaging blog posts, as well as how to promote them effectively.
Plan Your Content Strategy
Identify your target audience: Determine the group of people most likely to be interested in your niche and content. Understand their needs, preferences, and pain points to create content that resonates with them.
Generate topic ideas: Brainstorm a list of content ideas that address your audience’s interests and concerns. Use keyword research tools to identify popular search terms related to your niche and incorporate them into your content plan.
Develop an editorial calendar: Organize your content ideas and schedule them using an editorial calendar. This will help you maintain a consistent posting schedule and ensure that you’re always working on new content.
Write Engaging and Informative Blog Posts
- Use ChatGPT for ideas and writing: ChatGPT is a powerful AI writing tool that can generate content ideas and even assist with writing articles. Utilize it to brainstorm new topics and to generate quality content.
- Craft a compelling headline: Your headline is the first thing readers see and can make or break whether they read your article. Use attention-grabbing headlines that clearly convey the value of your content. If you don’t know what an attention-grabbing headline is, that’s where ChatGPT can assist. Simply ask it to write you a headline for your intended blog topic/idea!
- Write in a conversational tone: Write your blog posts in a conversational tone that engages your readers and makes them feel like they’re having a conversation with you.
Boosting Your Post With Visuals
Visual content is a crucial part of creating engaging and shareable blog posts. It is important to include high-quality images, infographics, and other visuals to attract and retain readers’ attention.
One great tool for creating these visuals is Canva, a free graphic design platform that allows users to create professional-quality designs for a variety of purposes.
The free version of Canva provides a variety of templates and design elements that can be used to create custom graphics, social media posts, landing pages, and more. It’s a great option for beginners or those on a budget who want to add some visual flair to their blog posts. However, if you are serious about creating high-quality visuals for your blog, I highly recommend upgrading to Canva Pro. This is exactly what I use to create all my blogging-related visuals!
As someone who has used Canva Pro for all of my visuals, landing pages, and subscription forms, I can attest to the added benefits it offers. Canva Pro provides access to a much larger selection of templates, graphics, and design elements. You can also create custom brand kits, resize designs for different platforms, and even collaborate with team members or clients.
In addition, Canva Pro offers a variety of tools for resizing and optimizing images for social media, which is crucial for ensuring your posts look great on all platforms.
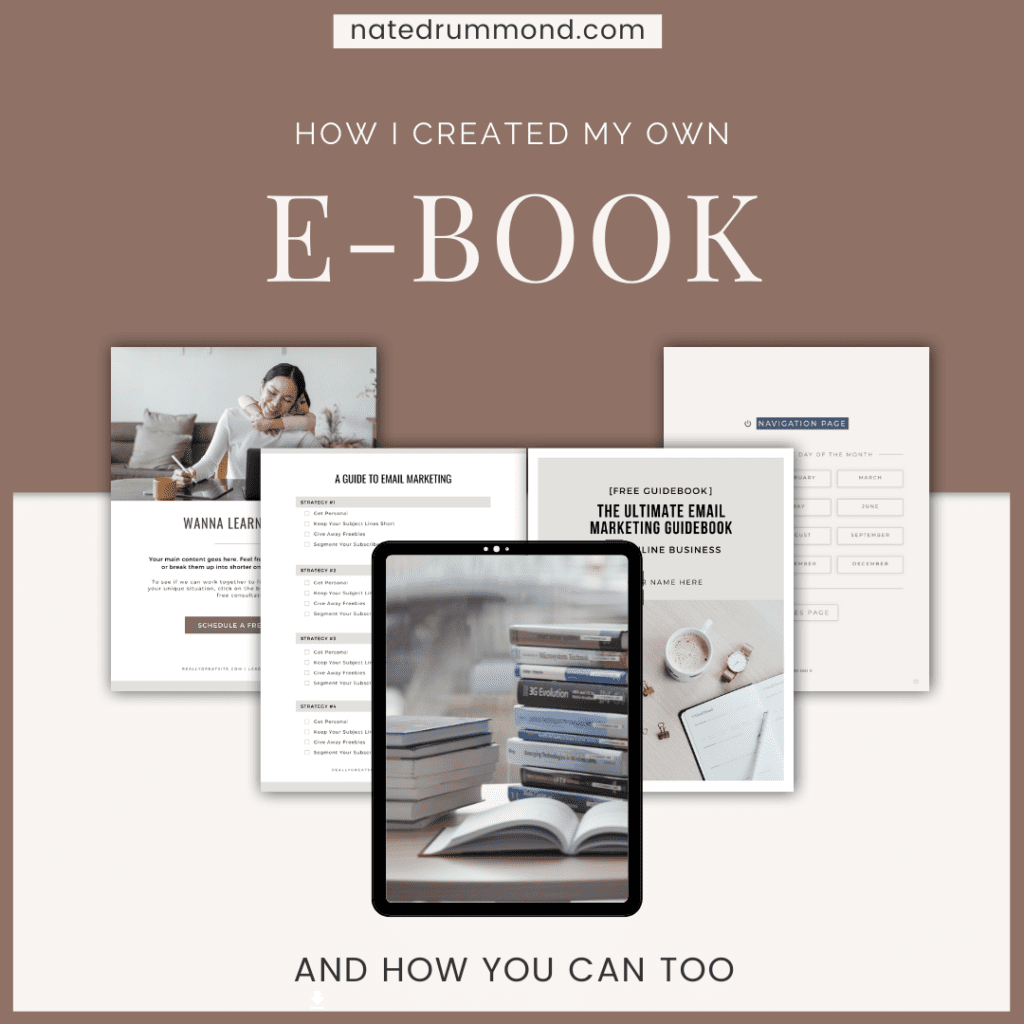
Check out some of the visuals I have produced using Canva Pro below. Remember, I had zero experience with graphic design or this tool, but the user interface is so easy and inituive, anyone can use it!
Or check out this subscription form I created using visuals I designed on Canva Pro!
Overall, whether you choose to use the free version or upgrade to Canva Pro, incorporating high-quality visuals into your blog posts can help boost engagement and drive traffic to your site.
If you are interested in trying out Canva Pro, I have a detailed Canva Pro Review post that provides more information about the platform and its features.
Otherwise, if you want to get started with Canva Pro right away, be sure to sign up using the link below to get a special offer for Trajectory To Wealth readers!
Trajectory To Wealth visitors get exclusive access to a 30-Day free trial with Canva Pro
Be Quick! This promotion won't last forever!
Promote Your Blog Posts
-
Share on social media: Leverage your social media platforms to share your blog posts and engage with your audience. Encourage your followers to like, comment, and share your content to increase its reach.
-
Utilize email marketing: Build an email list and send regular newsletters to your subscribers, notifying them of new blog posts and offering exclusive content or promotions.
-
Collaborate with other bloggers: Network with other bloggers in your niche to exchange guest posts, share content, or participate in joint ventures. This can help you reach new audiences and increase your blog’s visibility.
By following these steps, you’ll be well on your way to creating engaging, informative content that will captivate your audience and help you establish a successful blog. Remember to optimize your content with a focus keyphrase and relevant LSI keywords to improve its search engine ranking and visibility.
The Potential of Blogging: Beyond Hobbies and Interests
Monetization Opportunities for Bloggers
Blogging can open the door to numerous monetization opportunities, allowing you to earn income from your online presence. Some popular income-generating strategies for bloggers include:
Affiliate marketing: Promote products or services from other businesses and earn a commission for each sale or lead generated through your unique referral link. You can learn more about afilliate marketing in my post: Best Affiliate Marketing Networks That Pay Daily.
Sponsored content: Partner with brands to create sponsored blog posts, social media content, or product reviews, and get paid for your promotional efforts.
Advertising: Display ads on your blog through platforms like Google AdSense, and earn revenue based on the number of impressions or clicks on the ads.
Selling digital products: Create and sell ebooks, online courses, or other digital resources to share your knowledge and expertise with your audience. I have a developed a comprehensive guide with plenty of resources that works seamlessly with blogging. Check it out here to learn how to create and sell digital products online.
Offering services: Leverage your skills and experience to provide consulting, coaching, or freelance services to your readers.
Laying the Foundation for a Sustainable Income Source
As you start your blog, it’s helpful to be aware of the potential steps to turn it into a sustainable income source. While the path to achieving this may not be immediately clear, understanding the possibilities will help you make informed decisions as you build and grow your blog.
Diversify your income sources: Explore multiple revenue streams, such as affiliate marketing, sponsored content, advertising, selling digital products, and offering services. Diversifying your income sources early on will lay the groundwork for a more stable income as your blog grows.
Establish a loyal audience: Focus on creating high-quality, valuable content tailored to your readers’ needs and interests. This will not only help you build a strong connection with your audience but also encourage their support for your monetization efforts in the future.
Invest in your blog’s growth: Allocate time and resources to content creation, SEO, social media promotion, and email marketing. As you start your blog, being proactive in these areas will increase your blog’s visibility and traffic, paving the way for income generation.
Develop a long-term strategy: Set realistic goals and outline a clear plan for achieving them. Keeping these goals in mind as you start your blog will help you stay focused and ensure your blog’s growth and success.
- Stay informed and adaptable: Keep up-to-date with the latest blogging trends, best practices, and monetization strategies. As you start your blog, being willing to adapt and refine your approach based on new information will help you stay ahead of the curve and maximize your income potential.
By being aware of these steps from the beginning, you’ll be better prepared to capitalize on opportunities that arise as you develop your blog. With persistence and a well-planned strategy, you can successfully transition your blog from a hobby or interest to a sustainable income source, even turning it into a full-time career. Remember, the key is to stay dedicated and consistently work towards your blogging goals.
Monitor and Optimize Your Blog's Performance
As you create and promote content, it’s crucial to monitor your blog’s performance and make improvements where necessary. Regularly reviewing your blog’s analytics and adjusting your strategies will help you achieve long-term success.
Analyze Your Blog's Traffic
Set up Google Analytics: Install Google Analytics on your blog to gain insights into your website’s traffic, user behavior, and other vital metrics.
Track your performance: Regularly review your Google Analytics data to identify trends and understand which content resonates with your audience. Use this information to refine your content strategy and focus on topics that perform well.
Optimize Your Content for Search Engines
Conduct keyword research: Use tools like Google Keyword Planner, SEMrush, or Ahrefs to research and identify high-traffic keywords related to your niche.
Update existing content: Revise older blog posts to include relevant keywords, improve readability, and add updated information. This will help boost their search engine ranking and attract more traffic.
Monitor your search rankings: Keep an eye on your blog’s search engine rankings to identify opportunities for improvement. Adjust your content and SEO strategies as needed to boost your visibility in search results.
Engage with Your Audience
- Respond to comments and questions: Make a point to reply to comments and questions on your blog and social media platforms. This demonstrates that you value your audience’s input and helps build a loyal following.
- Ask for feedback: Encourage your readers to share their thoughts and suggestions about your content. Use their feedback to improve your blog and make it more valuable to your audience.
- Create a sense of community: Foster a supportive and engaged community by promoting discussions, sharing user-generated content, and highlighting success stories from your readers.
Stay Updated on Industry Trends
Follow industry leaders: Subscribe to newsletters and follow blogs or influencers in your niche to stay updated on the latest trends, news, and insights.
Attend conferences and webinars: Participate in industry-related events and webinars to learn from experts and network with other bloggers or professionals in your field.
Continuously learn and adapt: Stay open to learning new strategies, techniques, and tools that can help you grow and improve your blog over time.
By closely monitoring your blog’s performance and making continuous improvements, you’ll be able to adapt to changing trends and better meet the needs of your audience. This will help you create a successful, thriving blog that serves as a valuable resource for your readers and a source of pride for you as its creator.
Conclusion - How To Start A Blog With Bluehost
Starting a blog with zero experience is entirely possible with the right guidance and determination. By following the steps outlined in this post, you’ll be well on your way to start a blog with Bluehost. Begin by choosing a reliable web host provider like Bluehost, selecting a domain name, and setting up your blog on a platform like WordPress.
Next, focus on creating engaging, informative, and SEO-optimized content tailored to your niche. Promote your blog posts on social media, through email marketing, and by collaborating with other bloggers. Monitor and optimize your blog’s performance using tools like Google Analytics and by refining your content and SEO strategies.
Once you have established your blog and gained a loyal audience, explore various monetization methods like affiliate marketing, display advertising, and sponsored content. Finally, maintain and grow your blog by posting consistently, networking with other bloggers, continuously improving your skills, and adapting to changes in the industry.
By following these steps and staying committed to your blogging journey, you’ll be able to build a successful and profitable blog, even if you’re starting with zero experience.
I hope you have enjoyed this comprehensive guide on how to start a blog with Bluehost. I know your journey is only just beginning, but I’m here to offer support in any way I can.
So please feel free to send me through any questions and I’ll be sure to assist you in any way possible!
Frequently Asked Questions
Bluehost is widely recommended for new bloggers due to its easy WordPress integration, free domain for the first year, 24/7 customer support, reliable uptime, and competitive loading speeds.
Bluehost offers various hosting plans, including WordPress Hosting at $2.95/mo, BASIC for a single blog at $2.95/mo, CHOICE PLUS with added security at $5.45/mo, and PRO for optimized resources at $13.95/mo, based on a 36-month term.
Beginners can start a WordPress blog on Bluehost by visiting Bluehost’s official site, selecting a hosting plan, choosing a domain name, and following the on-screen setup instructions.
Bluehost provides a free SSL certificate, ensuring a secure connection for your blog and avoiding security warnings to users.
Package extras are available with Bluehost hosting but are not compulsory for running a blog. Users have the option to deselect these extras.
Users can create a Bluehost account by entering their domain name, creating a password, agreeing to terms and conditions, and following the steps to set up their WordPress blog.
The Bluehost onboarding process involves skipping suggested website creation steps and opting for WordPress for unlimited customization and full control over the blog creation.
Bluehost sends an email for account verification. After verifying, users can access the WordPress dashboard to start setting up their blog.
Initial setup includes deleting sample pages, posts, pre-installed plugins, and comments, and adjusting WordPress settings like user profile, general, writing, reading, discussion, media, permalinks, and privacy settings.
Choose a responsive, lightweight, and SEO-friendly theme from free or premium options like GeneratePress, Astra, or Divi. Install the theme from the WordPress dashboard and customize it using WordPress customizer settings.