
Learn how to start your own blog with this step-by-step guide. This guide is perfect for beginners with absolutely zero experience.
Today, with all the technology and tools out there – building your own blog has never been easier! Anyone is capable of building their own professional site, and you don’t even need to know how to write a single line of code to get started.
In this post, I am going to cover the key components that you need to set up your very own blog. I will draw on my recent experiences of setting up my own blog, trajectorytowealth.com.
Specifically, this post will cover exactly how and what you need to start your own blog.
This is a pretty long post, so if you would prefer it broken down into a series of easy to follow steps, then I suggest you sign up for my free email course below. This course guides you through every step of the way, ensuring you have all the information you need to know to start your own blog.
Disclosure: My website/blog is reader-supported and may contain affiliate links. If you decide to make a purchase through links on my site, I may earn an affiliate commission, at no extra cost to you. You can read my full affiliate disclosure here.
What You Need To Get Started
When it comes to starting your own blog, there are two key services that you will need to purchase to get up and running. These include a domain name and a web hosting service.
Definition – Domain Name
A domain name is the address of your website that people type in the browser URL bar to visit your website. It is a string of text that connects your website to an IP address, which allows someone to access your website from an internet-connected device. As an example, Google owns and uses the domain name ‘google.com’.
Definition: – Web host
A web host is a company that rents you server space for your website to exist and run on. A web host owns the actual computer where your website’s files are stored. These computers are contained in servers, and they are offered as a service by web hosting companies.
Before you can start hosting your website on a server, you need to first choose a domain name for your website.
Choosing Your Domain Name
Before you purchase your domain name, you need to come up with a name that you want your website to be known by. Since your domain name will essentially be the identity of your blog- when it comes to choosing a name, you should choose something that has as many of the following qualities as possible:
- Concise
- Catchy and memorable
- Brandable
- Logical – i.e. someone reading it for the first time would have some sense of what the site is about
- Not too constrained (i.e. does it give you room to grow/expand your content offering?)
As a case study, let’s look at my own domain name I use for my blog — trajectorytowealth.com.
The purpose of my blog is to discuss topics relating to personal finances and explore my goal of reaching a financially independent lifestyle.
In terms of conciseness, the word “trajectory” in my domain name hints at some form of journey or pathway towards something. This paired with the word “wealth” implies to readers that my blog will be something along the lines of working towards building wealth/personal finances — which is exactly what it is about. This ultimately is also very logical since it gives my readers context about what the content might be before they have even clicked into my blog.
Now I will admit, the one quality that is lacking in my domain name is how catchy and memorable it is. The phrase “Trajectory to wealth” may not be all that catchy, but that’s okay. My focus is more on building my own personal brand, such that my audience know that my content is genuine and an account of all the experiences I have learned throughout my journey.
In terms of brandable, this is actually the reason why I decided to rebrand my original domain name from natedrummond.com to trajectorytowealth.com. And the reason for this is because I thought long and hard about how I could best promote my own personal brand.
Owing to my full-time profession being a rocket engineer/scientist, I really wanted to incorporate this into my personal brand. In fact, a major part of my job is simulating the flight performance of rocket vehicles – in other words, predicting the trajectory of a flying vehicle. So this is where I got the idea to incorporate the term “trajectory” into my brand. I thought this worked perfectly with my website label, which shows a rocket ascending with a piggy-bank (symbolising wealth) being boosted away on its trajectory. So that’s why I think my domain name is the perfect fit to grow my personal brand.
Finally, by having a domain name that hints at working towards wealth, it leaves me open to being able to discuss a wide range of topics. For example, one area I write about on my website is cryptocurrency. Although I plan to continue to write more on this topic, it’s not the only topic I write about. If my domain name were instead something like ‘cryptonate.com’ (I won’t lie, typing that out and reading it aloud sounds a hell of a lot catchier), it would imply that I only write about cryptocurrency on my site, which is not the case. So, it’s important that you don’t over-constrain yourself by choosing a domain name that will constrain you to a specific topic if in fact you plan to expand your content offering in the future.
So assuming now that you have decided on a domain name that satisfies these qualities, how do we go about ensuring the name we want isn’t already taken?
How To Check If Your Domain Name Is Available
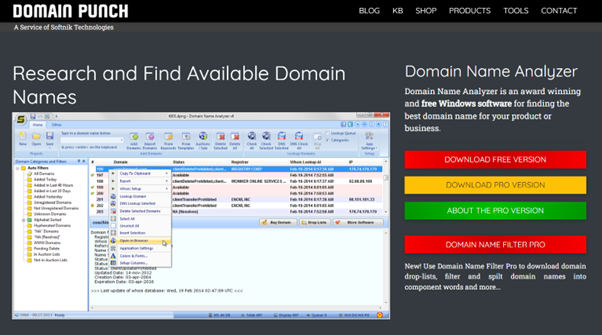
To do this, I employ the help of a software (don’t worry it’s free) that can check domain name availability for me. The software I am using is called Domain Punch and is accessible via https://domainpunch.com/. Basically, it allows you to enter multiple domain names at once to check their availability. You can also use a domain registrar such as Namecheap (where you actually buy your domain name) to check domain availability, but you can only search for one domain name at a time, which is why I like to use Domain Punch instead.
If you are interested in this tool, when you navigate to the Domain Punch website, you will see they have a free and a pro version. Since I’m all about trying to create and grow a website completely from scratch as cheaply as possible, you can sure as hell bet, I’m sticking with the free version, so don’t worry about downloading the pro version!
Once you have downloaded and installed the free version, open it up to get started.
From here, all you have to do is navigate to the ‘Add Domains’ button on the top toolbar panel. This will open up a panel where you can enter multiple domain names to check. Once you’ve entered all the domain names you want to check, simply press okay and then click the ‘Check all’ button on the top toolbar to see which ones are available or taken.
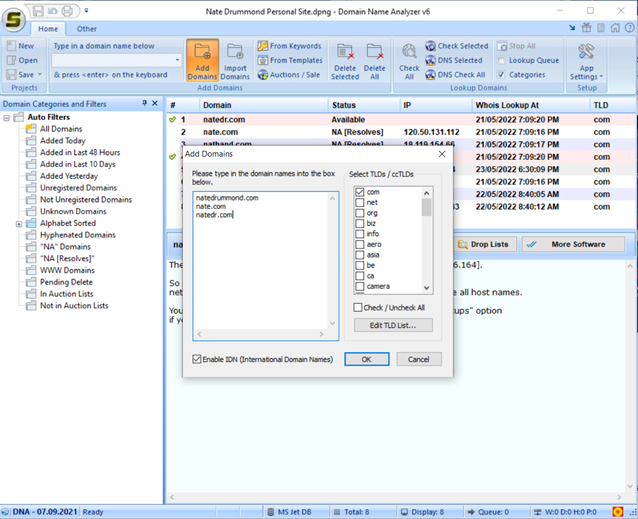
You will know if your domain is available by looking at the ‘status’ column (see image below). If the status reads available, then well it’s available, that’s all there is to it. If the domain is available, there will also be a green tick under the column with the # header, so this makes it easy to see which domains you entered are available. Since I have already purchased the domain name natedrummond.com, it shows NA in the status, which means it is already taken.

Check Your Domain Hasn’t Been Used Illegitimately
After you have determined that your desired domain name is available, there is one more step you should complete before you proceed to purchase that domain name.
Even if your domain name is available. i.e. no one else is using it – it doesn’t always mean it has NEVER been used before. So it’s important to conduct your own due diligence to make sure it hasn’t been used in the past, for evil… The way we can do that is by looking at internet archives. The simplest way to do this is to just type ‘Way back machine’ into the google search toolbar, which should return the following website as the top search result: https://archive.org/web/.
From here, its as simple as clicking onto the page and entering the domain name you’re planning on securing.
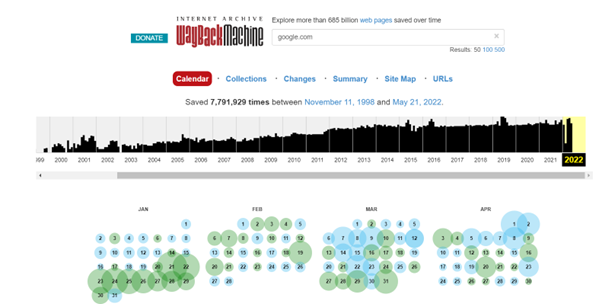
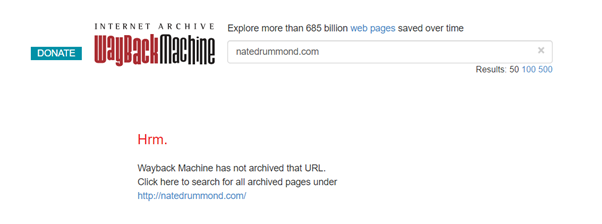
Using google.com as an extreme example, we can see Way Back Machine has archived a whopping 7,791,929 saves of this specific domain. But natedrummond.com on the other hand – well, it seems that apparently, I’m not as sought out for as much as Google is (what an eye-opening realisation that is). But in all seriousness, having no archived history on the domain you’re hoping to select is actually favourable. Otherwise, if there is a pre-existing history, whatever content was tied to that domain regardless of how long ago it was or if it has since been deleted, it could still interfere and mess with how your website ranks in web browsers in the future.
Way Back Machine makes it easy to check what type of content was associated with the domain if in fact there is an archived history. To check this, all we have to do is click on a specific date to view a snapshot of the website that existed at that particular time. This is incredibly helpful to learn about the history of the domain, which is important to us when deciding on our domain name, and here’s why. If a particular domain has a dark history, for example –published content on topics that are not approved by Google (illicit content for example), then even if that content was posted years ago on that particular domain, any future use of the domain could still be associated with that shady past, even if it was an entirely different owner publishing entirely different content. That’s why it’s important to complete your own due diligence on all domain names you’re considering choosing, such that you can make an informed decision and not be negatively impacted in the future by the choices of whoever it was who owned that domain all those years ago.
A Note On Domain Name Extensions
You might have noticed that all domain names end with something like a .com or a .uk. These are known as extensions. Now, when it comes to choosing a domain extension, I like extensions that end with a .com. The reason for this is that I am trying to cater for a worldwide audience. However, if you are targeting an audience that is specific to a single country, then it may be a better option for you to choose a domain extension that is specific to that country. For example, if you are targeting solely an Australian audience, then it would probably be a better idea to use a domain extension that ends in .com.au, since this is an Australian domain extension.
The reason why you may want to use country-specific extensions is that it may help your website rank better on Google in that specific country. In the .com.au example, your website would have an advantage on the google.com.au website, so people in Australia would be more likely to be directed to your website.
However, on the downside, using the extension .com.au would give your website a disadvantage from appearing on the Google.com website (which is used by a large US audience). However, even if you do have a .com extension, your website and content will still often rank on country-specific google sites (such as google.com.au). At the end of the day, Google looks at how its visitors interact with your site and ranks it accordingly. So basically, even if you are posting Australian content on a website with a .com extension, if your site engages your audience to remain viewing and browsing your website for extended periods of time, then it is likely to rank higher than a site where a visitor only spends a few seconds on your page before exiting, regardless of what the domain extension is.
That’s why I like to stick with the .com extension, because it gives me the advantage of accessing a wider customer base worldwide.
Now that you’ve decided upon your domain name and extension, it’s now time to buy your domain.
Buying Your Domain Name
There are two ways you can go about buying your domain name. These include:
- buying your domain through your web host, or
- buying your domain from a separate company known as a domain registrar (such as Namecheap).
We’ve already defined what a web host is, but what exactly is a domain registrar?
Definition: A Domain Registrar is a company that manages your domain name for you. It makes sure your domain is up and running and working safely. Most importantly, a domain registrar is where your Domain Name Servers (DNS) are managed and set. Your DNS identifies which web host the domain uses. So If you decide to move host in the future, you can simply change the DNS to match your new host.
Just so you understand this even clearer, the relationship between registrar and web host looks like this:

Basically, the domain registrar uses your DNS to direct your domain to the server hosted by your web host where your website is stored. That way, if you do need to move your website to another web host for whatever reason, all you need to do is update your DNS through your domain registrar account and upload a backup of your website to your new host. As soon as you update the DNS through your domain registrars account, the swap starts. After the DNS has updated (usually only takes a few hours) all visitors to your website are directed (by your registrar) to the new web host.
So, what is the best way to buy your domain name? Through your web host or through a registrar? This deserves some more attention, so let’s discuss the answer in the next section.
Why You Should Use a Separate Web Host & Domain Registrar
When you sign up for a web hosting service, the web hosting company will more than likely try to be your registrar as well. They often do this by offering you a free domain name for the first 12-months if you sign up for their web hosting service. Now I know that this sounds like it makes sense and would be a good idea – having just one single company looking after both your domain and web hosting needs, seems simpler and more logical, right? And although it may seem like this, having a separate company manage your domain name can actually offer way better security for the longevity of your site, and I’ll tell you why.
Let me start off by saying that I am a sucker for a good deal, I am always looking for cost-effective solutions. So, the fact that I am recommending purchasing your domain name from a separate domain registrar and not from your web host (who will likely offer you your domain name for free for the first 12 months) means I better have a pretty bloody good justification as to why. And don’t worry, I do.
And on that note, just so you know I am walking the walk and not just talking the talk, I personally have a dedicated web host for my hosting needs (I currently use Hostinger), but I also have a dedicated domain registrar for my domain name (I use Namecheap and don’t plan on changing anyone soon).
Alright, so although your web host may offer you a free domain promotion as an added bonus if you sign up with them for their hosting services, the thing is, that web host now becomes your domain registrar. Now the first reason why this isn’t the best idea is that once it does come time for your domain name renewal, you can expect to pay more for the annual domain renewal costs than what a dedicated domain registrar (such as Namecheap) would charge you. But that’s not actually the main reason why I recommend having the two services separated. No, there’s a more important reason(s).
It all comes back to something I mentioned previously, the longevity of your site. What I mean by that is – the time that your website experiences downtime in the event you do need to change your web host.
Let me explain. If your web host also acts as your domain registrar, in the unfortunate event that you ever have a dispute with your web host and that leads to them closing down your site, whether it be permanently or just temporary, it will make it all that much more difficult to have your site transferred to a new host. Often during disputes with your web host, they may refuse to allow you to transfer your domain from their service, depending on the nature of the dispute (such as late payments etc.). Similarly, if you’re simply unhappy with the services your web host is providing, for example, your site is experiencing atrocious downtimes and you decide you want to change to a more reliable web host, then you may also have trouble getting your website transferred to the new web host.
That’s because if your web host is your domain registrar, then they yield the power to block access to the DNS of your domain. Remember, the DNS is what connects your domain with the web host so that your site can run. So, unless your DNS is correctly configured to the specific web host, your site will not run.
So just to make sure it is crystal clear in your mind as to why it could be problematic to have your web host also managing your domain name, let’s step through the typical process of what is required to swap to a new web host if, in fact, your old web host manages your domain.
- Step 1: Contact your web host and inform them that you want to swap your domain to another registrar. Your web host will need to ‘unlock’ your domain name and give you an authorization code to swap it over.
- Step 2: Contact your new domain registrar and inform them that you are swapping your domain to their services. This requires you to provide them with your domain name and the authorization code. This means more emails and more waiting for responses.
- Step 3: Now, assuming everything is smooth sailing, and your current web host doesn’t create issues or try and prevent the swap from happening (there have been many stories I’ve read where the web host has caused excessive delays), the domain transfer will take approximately 7 days. So even if everything goes well, your website is going to incur around 7 days of downtime! In my book, that’s more harm done than good.
Consider another example, what if your existing web host goes out of business! If they are managing your domain, then you may have issues accessing the DNS of your domain. But if you have a separate domain registrar, then all you would need to do is change the DNS to match your new web host. Now you might be thinking, “okay but what if my domain registrar goes out of business?” Good point! You’d also have trouble if this were the case, that’s why it’s so important to pick an industry-leading domain registrar that has a proven history. That’s exactly why I’m with Namecheap, a reputable registrar, so the chances of them going under are close to negligible. My advice, it’s simply not worth skimping out and going for a company that doesn’t specialise specifically in domain registrar services.
I hope these examples have demonstrated why having a trustworthy domain registrar is so much safer than the idea of having your web host manage your domain as well.
Although I highly recommend having separate companies managing your hosting needs and your domain needs, at the end of the day, if you decide this approach is too much effort to manage, you can opt for your web host company to act as a combined registrar and host when you signup. If you’re not doing anything malicious with your website, then really you shouldn’t ever come across disputes with your host. Just know that my preference is to have the services separate, but if for example, you do want to capitalize on the free domain services provided by many web hosts (such as Hostinger), at the end of the day, it is getting your website up and running that is the most important part. Just be aware that it may come with some risks surrounding transferring your web host to another provider in the future.
KEY TAKEWAY
If you have your own dedicated domain registrar, all you have to do to change your DNS is login into your domain registrar account and update/change the DNS to match your new host. There’s literally nothing your old web host can do about it to stop you. This means that you can swap web hosts and have your website back up and running in just a matter of hours, as opposed to waiting days/weeks if you were to have a dispute with your old host and they don’t play nice.
Why I recommend Namecheap
I recommend Namecheap as a domain registrar because they specialise in domain names. This company has a proven track record of over two decades and everyone who I have ever spoken to that uses their services have not had any issues – everything works as it should. Given the importance of having a reliable domain registrar, I wouldn’t trust my domain with any other company, even if they did offer lower prices.
Buying your domain name with Namecheap is cheap and easy. All you need to do is create an account, enter your domain name and make the purchase, as simple as that! Once you have your domain name, you can go and get your web hosting service.
What Web Host Do I Recommend?
If you do a google search of web host providers, you will find a sea of options available. Although I will not go into detail about all of the web hosts out there, there are tonnes of reviews out there that you can reference to help you choose a web host that is best for your needs. That’s exactly what I did. And although your circumstances may be different to mine, I can tell you what was most important to me when I was looking for a web host. Primarily, the biggest factor that influenced my decision was cost and user-friendliness. So after comparing many web hosts, I ultimately decided to go with Hostinger to manage all of my hosting needs. If you want more information about this company/service provider, I have written a detailed review of their services, read it now.
Again, your circumstances may be different, but my personal experiences with Hostinger have so far been seamless. As a newbie to website creation and blogging, I have found Hostinger to be extremely easy to use as well as cheap and reliable, so I think it’s a great budget option for newbies starting out.
So if Hostinger sounds like it would be a good fit for you, be sure to get a discounted price by signing up through my referral link! (As I conclude in my review, I recommend the Premium plan!).
Bluehost is another stand out pick for web hosting if you want a hassle-free host that you plan to stick with long-term. You can check Bluehost’s website out here, otherwise, you can read my detailed review to learn more about their services.
Bluehost is the pinnacle of web hosting made easy, and it’s actually recommended by WordPress themselves as one of the top web hosts for beginners. So although it is slightly more expensive than Hostinger for what you get, it does a great job of simplifying the process for beginners.
So if you do decide to go with Bluehost instead of Hostinger, I even have a comprehensive step-by-step guide on how to set up your blog with Bluehost, so be sure to check it out!
Either way, both are great options and provide ultra fast hosting speeds!
How To Install And Create Your WordPress Site
Moving into the future, I do plan to write specific guides on how to get your WordPress site up and running. But in the meantime, in case you are eager to take the next step beyond setting up your domain and web hosting service, and actually now creating your WordPress site – I recommend watching tutorial videos on YouTube describing how to install and create your WordPress website from your web hosting interface. Specifically, I used this video as a guide to create my own WordPress website:
How To Make a WordPress Website – 2022
It is a long, comprehensive tutorial covering everything you need to know. Although do note that in the tutorial the author doesn’t opt for a separate domain registrar, so you can skip the first ~7 minutes if you already have your own domain registrar and web hosting service. Basically, as long as the web hosting service you buy comes with the cPanel interface, the WordPress installation and creation process is exactly the same, so I definitely recommend giving it a watch if you’re eager to get your site up and running!
Good luck and I hope you found some value in this post!